
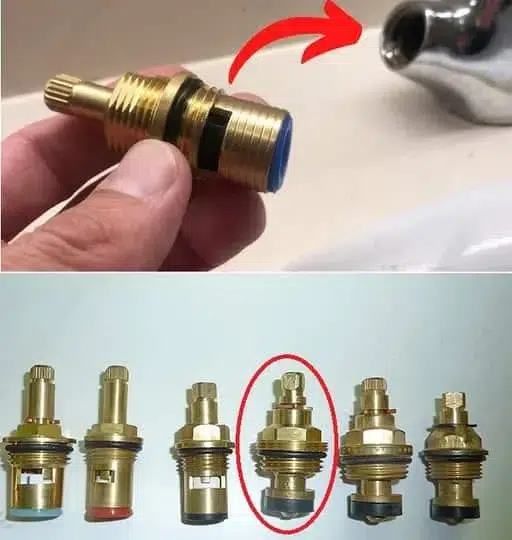
A dripping or leaking faucet is one of the most common—and annoying—household plumbing issues. Beyond the persistent sound of water dripping night and day, a leaking faucet wastes hundreds of gallons of water each month, spiking your utility bills and potentially causing long-term water damage to countertops, vanities, and under-sink cabinetry.
Many homeowners immediately call an expensive plumber when a faucet begins to leak or lose water pressure. However, modern plumbing fixtures are designed with modular internal components. In fact, replacing an internal faucet stem or ceramic disc cartridge can solve up to 99% of common faucet problems. Understanding how faucet cartridges work and following a straightforward step-by-step DIY repair process can save you hundreds of dollars in plumbing service fees while restoring your fixtures to perfect working condition.
Understanding Faucet Architecture: Stems, Cartridges, and O-Rings
To fix a leaking faucet effectively, it helps to understand what is happening inside the fixture when you turn the handle. Modern faucets generally operate using one of four internal mechanisms: compression valves, ball valves, cartridge valves, or ceramic disc cartridges.
1. Compression Stems vs. Cartridge Valves
Compression Stems: Traditional two-handle faucets often use brass compression stems. When you turn the handle, a threaded stem compresses a rubber washer against a metal seat to stop water flow. Over time, friction degrades the rubber washer or corrodes the stem, resulting in steady drips.
Cartridge and Ceramic Disc Valves: Modern single and dual-handle faucets utilize plastic or brass cartridges containing ceramic discs. When aligned, holes in the discs allow water to flow; when rotated, the discs seal off the flow completely. While durable, mineral buildup, scale, or worn rubber O-rings will eventually cause leaks around the handle or spout.
2. Identifying the Root Cause of Faucet Leaks
Leaks from the Spout: Usually indicates worn internal washers, damaged ceramic discs, or a degraded main cartridge seal.
Leaks Around the Handle Base: Typically caused by failing O-rings or loose retaining nuts inside the handle assembly.
Low Water Pressure or Irregular Flow: Often caused by mineral deposits clogging the faucet aerator or restricting internal cartridge ports.
Practical DIY Guide: Replacing a Faucet Cartridge or Stem Step-by-Step
Replacing a faucet cartridge or stem is a simple project that requires basic hand tools and minimal plumbing experience.
Tools and Materials Needed
Adjustable wrench or channel-lock pliers
Flathead and Phillips screwdrivers
Allen (hex) wrench set
Replacement cartridge or brass stem (matching your exact faucet model)
Plumber’s silicone grease
Replacement rubber O-rings and washers
Step 1: Shut Off the Water Supply
Before loosening any plumbing components, locate the shut-off valves beneath the sink and turn them clockwise until fully closed. Open the faucet handles to relieve remaining water pressure and drain excess water.
Step 2: Remove the Faucet Handle
Locate the decorative cap (often marked “C” or “H”) on top or behind the handle. Pop off the cap with a thin flathead screwdriver to reveal the retaining screw. Remove the screw and gently pull the handle off the valve stem. If sticky, pry gently or use a handle puller.
Step 3: Remove the Retaining Nut or Clip
Depending on your faucet brand (such as Moen, Delta, Kohler, or Pfister), the cartridge is secured by a brass retaining nut, a threaded collar, or a U-shaped retaining clip. Use an adjustable wrench to unscrew the nut counter-clockwise, or pull out the clip with needle-nose pliers.
Step 4: Extract the Worn Cartridge or Stem
Grasp the top of the valve stem with pliers or a specialized cartridge puller tool and pull straight up. Note the exact orientation of the cartridge so you can install the new part in the identical position.
Step 5: Install the Replacement Part and Reassemble
Coat the rubber seals of the new cartridge with a light layer of heat-resistant plumber’s silicone grease. Insert the new cartridge into the valve body, securing it with the retaining nut or clip. Reattach the handle, turn the main water supply back on slowly, and check for leaks.
Financial, Insurance, and Legal Implications of Home Plumbing
Maintaining your home’s plumbing system extends beyond daily convenience; it directly impacts property value, insurance claims, and monthly expenses.
Protecting Your Property and Managing Expenses
Preventing Water Damage Claims: Minor leaks left unaddressed can seep into surrounding walls and flooring, leading to mold growth and expensive structural repairs. Home insurance policies may deny claims caused by long-term, unaddressed maintenance neglect.
Substantial Cost Savings: A professional plumbing service call can cost anywhere from $150 to $400 or more, whereas a replacement faucet stem or cartridge typically costs between $10 and $35 at local hardware stores.
Utility Bill Optimization: Fixing a single dripping faucet can save thousands of gallons of water annually, directly lowering municipal water and sewer bills.
Practical Maintenance Tips to Prevent Future Leaks
Keep your faucets operating smoothly with these simple preventive maintenance habits:
Clean Aerators Periodically: Unscrew the mesh aerator at the tip of the spout every few months to rinse out trapped sediment and mineral scale.
Avoid Overtightening Handles: Turning faucet handles with excessive force crushes rubber washers and wears out ceramic discs prematurely.
Install a Whole-House Water Softener: Hard water mineral buildup severely shortens the lifespan of internal cartridge seals and brass stems.
Use Plumber’s Silicone Grease: Always lubricate new O-rings during installation to prevent friction tear and ensure watertight seals.
Fascinating Insights into Plumbing Engineering
The Ancient Origins of Valves: The basic mechanics of screw-down compression valves date back to ancient Roman plumbing systems, which used bronze stopcocks to manage municipal water aqueducts.
Ceramic Disc Longevity: Modern ceramic disc cartridges are engineered from diamond-hard ceramic materials, allowing them to withstand millions of rotational turns before experiencing wear.
Standardized Cartridge Designs: While many proprietary cartridge shapes exist today, industry initiatives continue to push for universal modular cartridges to simplify home repairs.
Mastering Simple Home Repairs
Learning to fix a leaking faucet by replacing worn internal cartridges or stems empowers you to take control of basic home maintenance. With minimal investment in basic parts and tools, you eliminate irritating drips, reduce monthly water bills, and protect your home from costly water damage.
Frequently Asked Questions (FAQ)
How do I know which replacement cartridge to buy?
The easiest method is to turn off your water, remove the old cartridge, and bring it directly to your local hardware store to match its length, spline count, and base shape exactly. Alternatively, check your faucet’s brand name and model number online.
Can I just replace the O-rings instead of the entire cartridge?
Yes. If the plastic or brass body of the cartridge is intact and undamaged, simply replacing worn rubber O-rings and seats can often stop leaks at a fraction of the cost.
Why is my faucet still dripping after replacing the cartridge?
If a leak persists after installing a new cartridge, inspect the valve seat inside the faucet body for corrosion, pitting, or mineral debris that might be preventing a tight seal.
Do I need specialized tools to replace a faucet stem?
Most standard faucet cartridge repairs require only basic tools like screwdrivers, pliers, and an adjustable wrench. Certain brands (like Moen) may occasionally require a inexpensive cartridge puller tool if the old part is stuck due to mineral scale.
